Continue Modeling & 3d printing & technical progress - Week 12 & Week 13
Week 12 Onshape Tryout

In my learning plan, I did mention I want to learn OnShape software. And I did it. As a beginner in the software, I search for some online tutorials to try to familiarize myself with how to use it. I also asked my friends who are experts in this software to teach me about some basic tools for using it. Onshape Modeling
Here are some of my outcomes while learning OnShape software


 The holes around the 4 corners - hold the screws
 The holes on the top of the device - microphone
Testing the User-friendliness of the product
While doing this, I also did some quick user testing on the user-friendliness of this product. I gave them the scenario and ask them what would they do on the occasion.
User 1
User 2
From the quick user testing, I ask them about their preferable microphone placement, and both of them gave the same answer which is the top part of the device same as what I expected. The reason they prefer the top part is that they get to easier accessing the microphone, the gesture of one hand holding the device proves that the top part is the most suitable way to record audio. Overall look
The inner part of the device - uses for holding the buttons
 The center attach part of the device - uses for holding the soldered Arduino board and its component.
 The button cover- attach the button component and this cover will be displayed outside.
 The button cover- attach the button component and this cover will be displayed outside.

User 2
From the quick user testing, I ask them about their preferable microphone placement, and both of them gave the same answer which is the top part of the device same as what I expected. The reason they prefer the top part is that they get to easier accessing the microphone, the gesture of one hand holding the device proves that the top part is the most suitable way to record audio. Overall look

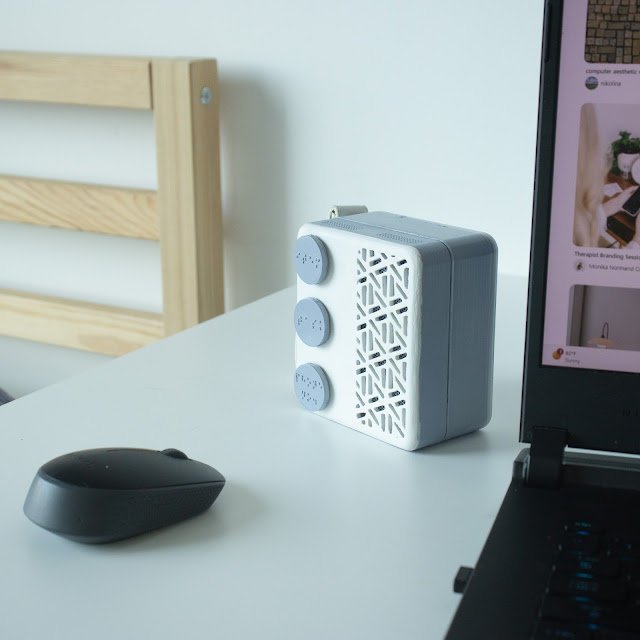
The overall look of the device

 Get the wrong width of the button cover, it's too thick
 Intentionally did this to get the correct size of the button cover

3d printing again & testing


Week 13 Soldering the Arduino component To actually scale down the size of the Arduino, I need to solder them to make them smaller and fit into the device. As a beginner, I tried to search online about soldering to make sure that I'm going on the right path. I do try out different ways of soldering them to make sure they are not affected.


Help me to learn OnShape software.
Soldering tutorials
3d printing

 Get the wrong width of the button cover, it's too thick
 Intentionally did this to get the correct size of the button cover
3d printing again & testing


Week 13 Soldering the Arduino component To actually scale down the size of the Arduino, I need to solder them to make them smaller and fit into the device. As a beginner, I tried to search online about soldering to make sure that I'm going on the right path. I do try out different ways of soldering them to make sure they are not affected.

First method - directly solder component to the board

The second method - is not solder components to the board
I then ended up wasting the components that had soldered to the board because I change the method of soldering to make sure the component can be easily removed without soldering it.
which is using this female pin header that can attach the Arduino component and I just solder the pin. In case, I want to change the placement of the Arduino circuit, I can easily remove them by detaching them.
But the downside of doing this is it will need more space for the whole Arduino circuit thing.

Confirmed amplifier attached to the circuit

By doing this, destroy an unwanted speaker given by the lecturer, and take out its amplifier inside, it works well in this case.

By doing this, destroy an unwanted speaker given by the lecturer, and take out its amplifier inside, it works well in this case.
References List
OnShape tutorials
CAD Intentions w/Brandon (2022). Onshape Beginner Tutorial: Tips, Tricks & Practice! - Learn Onshape & Follow Along Example. [online] www.youtube.com. Available at: https://www.youtube.com/watch?v=AwAh41hCepg&t=7s [Accessed 22 Feb. 2023].
CAD Sessions (2017). Beginner Tutorial 1/5 - Onshape 3D CAD - Creating Sketches and Objects. YouTube. Available at: https://www.youtube.com/watch?v=pMWnsHpDlQE [Accessed 14 Feb. 2023].
Help me to learn OnShape software.
Soldering tutorials
Category5 Technology TV (2020). Soldering Headers to a PCB. [online] www.youtube.com. Available at: https://www.youtube.com/watch?v=J9NSf03RrPg&t=250s [Accessed 15 Feb. 2023].
electronhacks (2013). Beginner how to Solder. YouTube. Available at: https://www.youtube.com/watch?v=oqV2xU1fee8 [Accessed 17 Feb. 2023].
Help me to know more about solderings
Help me to know more about solderings


Comments
Post a Comment